Pages

27.2.11

More tapas!

Something I love about Madrid is that the tapas come free with a drink. Order a beer, get a tapa. Order another drink, get another tapa. Genius!
My younger sister, Annie,  happened to be studying abroad in Salamanca, Spain during my first three months overseas. The first time we met up, we decided to go to Madrid for the weekend. Annie had met a girl named Maria on her flight to Spain who just so happened to be from Madrid, and she invited us to stay at her house. We had so much fun. Maria is so wonderful and her family was incredibly welcoming. Her father even showed me how to make a Spanish tortilla and gazpacho-and they were outstanding.
One of our nights with Maria, she brought us to a little bar and we met up with her friends and boyfriend. We drank beers and were brought little plates of patatas allioli, Russian salad (which is, incidentally, a Spanish dish!), and mussels cooked with diced bell peppers. 
A few months later, I went to Madrid again because my parents had decided to fly out and see us! We had a few great meals, but this one tapa has stuck out in mind ever since.
Cooked in a clay dish, it consisted of three layers. On top, my all-time favorite tapa: pimientos de Padron. I wish I could get these chile peppers here in the States! They are savory, salty, juicy and sometimes fiery spicy. My sister once ate one so spicy that she started hiccuping and tears formed in her eyes- our waiter literally sprinted inside and got her a bottle of water, insisting it was on the house! So nice.
The second layer of this dish was chorizo, and it had become nuanced with the pimento flavor. At the very bottom of the dish, soft and exploding with flavor from the other two layers, was potato. It was so simple, yet I'd never seen anything like it. The flavors mingled together beautifully and now, more than a year later, I can still remember exactly how it tasted. I might even say it was the best thing I ate in Spain.
Now, unfortunately, if it is possible to find pimientos de Padron here in Boston, I don't know about it. I hemmed and hawed about what sort of chiles to use that wouldn't be too spicy to handle but would be small enough to use. I finally gave up and just used Anaheims, which are pretty mild, but large. I also sliced them up. If you can find a small, not searingly spicy chile, go ahead and keep them whole! 
Pimientos, Chorizo y Patatas

Ingredients
2 Anaheim chile peppers, in thick rings
2 cooking chorizo sausages, sliced
1 large potato, cut in about quarter inch thick slices 
Olive oil
Sea salt
Paprika 
 
Preparation
Preheat your oven to 400F. (About 200C) 
Use a small, ovenproof dish. Coat the bottom with a thin layer of water. (This will help keep the potatoes soft.) 
Coat the sliced potatoes with olive oil, some salt, and paprika. Spread out over the dish.
Put the sliced chorizo over the potatoes for your second layer.
Coat the chile peppers with olive oil and plenty of salt. Arrange as the top layer.
Pop into the oven and cook for about 45 minute to an hour, or until the potatoes are soft and the chiles are roasted.
This dish is absolutely irresistible. You will be astounded by how flavorful the potatoes become. And your kitchen will smell incredible.
This could feed four as part of a larger meal. 

¡Buen Provecho!

26.2.11

"And here in Spain I am a Spaniard..."

My first time in Barcelona was an absolute whirlwind. 
 Let me back up. I spent two weeks in the beautiful and remote Extremadura region of Spain last October. (I will eventually write about my wonderful experiences there, but let's stick to the story.) The plan from there was to catch a bus to Madrid and get on an EasyJet flight to Basel, Switzerland, where I would hop a train to an apple farm. 
Looong stupid story short, I got to the airport with plenty of time to spare, but the line was ridiculously long and the man behind the counter was taking his sweet time,  and by the time I got to the front of the line, they said it was too late for me to board. There were no more flights to Basel until more than a day later and I would have to pay for it again.
While crying hysterically, I noticed that there was a flight leaving for Toulouse in a few hours. Seeing as I had to buy a ticket somewhere, this seemed like the best option, so I called Lisa, and told her I was coming back to Montpellier.
Hours later, when she met me at the Gare de Montpellier-Saint-Roch, we were wearing the same outfit. I love good friends.

Usually when I went to Montpellier after being away, I gave Lisa some sort of food related gift, but since I didn't know I would be seeing her, I didn't have anything. (I did buy her some ham flavored chips at the airport) She said it was okay that I didn't get her a Spain souvenir, since...guess what! We were going to hitch to  Barcelona in two days with our friend Alissa. (It's only a five hour drive from Montpellier) Was I okay with that? She assured me that we would do it on the cheap, and soon enough I found myself making hitching signs on the blank insides of old cereal boxes...
When we finally arrived, we were exhausted and of course, ravenous. We dropped our backpacks in our hostel, and decided to go get tapas with some of the other girls in our room. (A lovely pair of sisters from Mexico!) We were presented with plate upon plate of absolutely amazing dishes and pitchers of sangria. Cured ham, manchego cheese, patatas bravas, pan tomate, pimentos de Padron, creamed mushrooms on toast, chorizo...it was heaven. Especially for girls who had eaten their lunch on the side of the road! (I can't complain, actually. We found a pomegranate tree.)

The food was fantastic and so was the atmosphere. It was such a treat for me to go out to dinner, so it felt really special.  Such a great way to start a superb weekend in this dynamic city. We spent our days walking until our feet hurt (which just meant siesta time!) and our evenings enjoying good food, wine, and the vibrant personality of the area. We went to the Picasso Museum- it's free on the first Sunday of every month, which we were delighted to discover...the line wrapped around the block but it was worth it. It also happened to be Halloween weekend when we were there. We spent our Halloween drinking calimoxo (red wine and Coke) by the water and then bar-hopping. We made friends. We sang on the Ramblas in an attempt to pay for our hostel. (Not the most successful busking adventure I've had, but both an old man and a living statue sang along with us, which made it allll worth it.) We watched a live crayfish leap off an overflowing stall of seafood at the Mercat de La Boqueria. A woman attempted to steal Alissa's wallet but took her camera case and we caught her anyway, since she didn't even try to walk away. (Worst pickpocket ever?!?) 
Wow, I am rambling on and on and this doesn't even begin to cover the fun that went on that weekend. But let's talk food.
It may not be fancy, but pan tomate is one of my favorites. It is so simple. It's a typical Catalan dish consisting of ingredients you probably have in your own kitchen; bread, oil, garlic and tomato....what's not to love?
I had other versions of it in other regions of Spain, but this is what I had more than once that weekend in Barcelona. It's fresh tasting and flavorful.  If you're serving tapas, this is something that you can add to your table with pretty much no thought.
Pan Tomate

Ingredients
A slice or two of bread- a nice country loaf is good. Cut thick slices.
A clove of garlic, unpeeled, sliced in half and lightly scored
A ripe tomato, cut in half
Good quality olive oil 
Preparation
Toast the bread. You can do this over a grill or in a toaster. I imagine sizzling it in olive oil would also be fantastic, but I think this is actually the authentic way. (But I am not sure. Don't quote me on that!) 
When the bread comes out of the oven, rub the garlic all over the bread. Don't overdo it, as it's raw and you don't want a harsh taste! 
Take the tomato and rub it generously over the bread. Use as much as you can without making the bread soggy!
Drizzle your olive oil over. Sprinkle with a bit of salt and you are good to go!
How simple? It's so good. You can really use any kind of bread. Baguette works fine. I did it sometimes on the kibbutz with sandwich bread. It's just a tried and true Mediterranean flavor combination that pleases the tastebuds!

Enjoy! And ps...I've got another tapa for you tomorrow...

25.2.11

Orange White Chocolate Chip Cookies

I got this recipe from the Magnolia Bakery cookbook a while back. I've made it quite a few times and it always has an excellent response. The dough tends to be a bit dry, but somehow the cookies themselves are soft and moist. I have made a few changes to Magnolia's original recipe (the original recipe uses far less orange zest than I do, and calls for vanilla chips, which I couldn't find.) 
If you are looking for a unique, delicious and straightforward cookie recipe, you might want to give this one a go...
 Orange White Chocolate Chip Cookies
Recipe adapted from the Magnolia Bakery cookbook
  
Ingredients
2 1/4 cups flour
3/4 tsp baking soda
1/2 tsp salt
1 cup unsalted butter, softened
1/2 cup sugar
1/2 firmly packed light brown sugar
1 large egg, room temperature 
The zest of one good sized orange
1 cup white chocolate chunks (or vanilla, if you can find it...) 

Preparation

Preheat the oven to 350f. (Or, if you're me, to 349. The 5 button on my oven has decided not to work anymore. What an inconvenient button to stop working! Why can't it be 9???)

In a large bowl, sift together the flour, baking soda and salt. 
In another large bowl, cream the butter with both sugars for about three minutes, or until smooth. Add the egg and mix well, then incorporate the flour and beat thoroughly. 
Stir in the orange zest and the white chocolate chunks. 
On a baking sheet (or two) put teaspoon sized balls of cookie dough. Leave enough room between them to spread out.
Bake for 10-12 minutes. I usually take mine out at 11. They will still be super soft when they come out but firm up after a minute or so. If you're worried, check the bottoms.  If they're  golden, you're good to go. 
These cookies are so tasty...kind of impossible to just eat one...
Enjoy!

20.2.11

Quinoa and Salmon Salad

Here I am conducting a food interview on the kibbutz!
This recipe is inspired by the very first food interview I ever conducted. The interviewee was my delightful friend (and my kibbutz roommate!) Rebecca, who grew up in Sweden. She mentioned that she liked to make a salad of quinoa and gravlax. It sounded so good- light, fresh, simple.
So, recently, I've been trying to find lots more people to interview. I'm just on a roll with it, I guess. So I've been looking over the interviews I've already typed out, I saw Rebecca's mention of a quinoa and lax salad, and I knew that a spin on that was exactly what I wanted for dinner.... 
I knew I wanted to use rocket, because I'm obsessed with it. (Fun fact: eating it before bedtime gives you crazy dreams!) The fennel aspect happened because I, from far away in the supermarket, thought it was dill! I walked closer, saw it was fennel, and thought... "Fennel! Hmm....." And somehow the fennel lead to the lemon and honey. I don't know. It sounds weird. But I loved how different yet complimentary all the flavors were...and the textures! 
 By the way...if you are interested in being food- interviewed, please drop me a line. I don't care if I don't know you- we can do it through email!  
Onward...


Salmon and Quinoa Salad

Ingredients
1/2 cup sprouted quinoa
About 2 cups of rocket/arugula leaves
4 oz smoked salmon, cut into bite sized pieces
1/2 bulb fennel, julienned
1/2 red onion, chopped finely
The juice from 1/2 a large lemon 
4 tbsp sunflower or other innocous oil (olive just seems a bit overpowering a flavor for this)
1 tsp honey
a good pinch of dried dill, or a larger amount of fresh, chopped. 

Preparation
Prepare the quinoa according to the package. This will take about 15 minutes to cook up, so in the meantime...
Whisk together your lemon juice, oil and honey. Season with salt, pepper and dill.
Toss all of your ingredients together when the quinoa is reading. Add the dressing last, since the greens wilt very easily.
Speaking of easy, how simple is this recipe? 
This makes a great dinner for two, or a side salad for more.

Enjoy!

18.2.11

Chocolate Sesame Shortbread

Chocolate and sesame? What is this madness?
Really one of those "don't knock it till you try it" sort of things. I really like the combination of flavors; a more unexpected and earthy "sweet and savory" than salt and chocolate (which I love), but from the same school of thought. There's a Belgian line of chocolates called Côte d’Or that sells sesame chocolate and it is fabulous. A very popular brand of chocolate in France, my friends and I used to buy the "Sésame Noir" quite often, to be eaten with coffee, or during a movie, or just on it's own.
Côte d’Or is so delicious. The day I got to Ghent, Belgium, I asked my couchsurfing hosts what the best type of Belgian chocolate is. The answer was unanimous: "Look for the elephant". And so, we did. I have happy memories of eating chocolate with Lisa in the achingly beautiful town centre, overlooking the water, contemplating the decision I'd just made. See, I ended up in Belgium only a week after leaving the United States. I had no plans, limited funds, and no flight back home.  The possibilities were endless...a thought that was both thrilling and intimidating. But Belgium, I think, was a good place to start.
 I had been inexplicably drawn to the country and I was thrilled to be there. It really is a place of wonder. The buildings are charming, cozy and somehow autumnal. (That may have just felt this way, as I was there in September).  People are friendly,  funky, adventurous and exciting to be around. During my week in Ghent, I met so many artists, dreamers, squatters and expats.  We were given impromptu tours, shown little undiscovered spots, and treated like old friends. We spent our days wandering the intimate, cobblestone streets and smelling the frites sizzle in oil, the mussels steam in wine, and the distinct buttery sweet scent of  Liège waffles that wafted from the restaurants, cafes and homes lining it. (Literally. Lisa and I actually walked past one house about five times because of the irresistible aroma of chicken roasting in butter that emanated from their open window...) We spent evenings at our host's favorite coffee shop, ambient with multicolored burning candles and rich hot cocoa. Then we'd all head back to their funky apartment, where we'd drink Leffe  and play with their kitten, Mooi. (Flemish for "adorable")
We were also invited along to parties, barbecues, and a very interesting dinner get-together. The dinner was held in a large room in a small building, sort of a tavern. Everybody who came threw a couple of euros in a cup and then helped themselves to a big pot of vegetarian stew. Music was playing, people were laughing and beer was flowing. When everybody finished eating, everyone started drinking and carrying on, dancing...it was a great atmosphere. I loved it. Another wonderful day included a walk to the monastary. There were dozens of different apple and pear trees, and we spent hours with our host, lolling in the grass and crunching on fresh picked apples, still warm from the autumn sun.  
Anyway, in honor of a delicious chocolate bar from a magical country...


Chocolate Sesame Shortbread

The recipe for the shortbread dough is pretty much taken directly from the  Gourmet cookbook. (A cookbook...really a tome.) And then I just improvised a bit. I know chocolate and sesame sounds strange, but try it! I really think I'm onto something with this! Plus, it would make a nice gift.
I find for toasting sesame seeds that it is the easiest to control over stovetop. All you need is your tiniest frying pan and just toss your seeds on it with no oil, butter, or water. When the seeds are fragrant and golden, they're ready. 
I pressed some sesame seeds into the dough when it was about to into the oven...but I wonder how it would turn out if I rolled some seeds into the dough? If anyone does that, let me know. 
Oh, finally. Okay. The original shortbread recipe said to combine with a fork but I actually used my food processor. It turned out beautifully, better than I expected.

 Ingredients
1 stick (8 tbsp) butter, softened
1/4 cup sugar
1/2 tsp vanilla extract
1/8 tsp salt
1 cup flour 
A good handful toasted sesame seeds, optional.

FOR THE TOPPING
1/4 cup chopped, good quality dark chocolate
1/2 tbsp butter
1/8 cup sesame seeds, toasted  

Preparation

Preheat your oven to 375 F. 
Blend together butter, sugar, vanilla and salt with a fork until well combined. (As I mentioned above, I actually used a food processor)  Sift flour over butter mixture and blend with fork (or in food processor) until a soft dough forms. 
Press the dough onto an ungreased baking sheet. Use a knife to cut into squares.
If you're using extra toasted sesame seeds, sprinkle on the dough and then press it down gently.
Bake the shortbread for 15 minutes. While still warm, cut and separate the squares and cool.

While the shortbread is cooling, make a small double boiler on your stovetop. (Just use a small saucepan and a small metal mixing bowl)
Melt the butter and chocolate over the double boiler, and then fold in the toasted sesame seeds. 

As soon as the shortbread is cooled, carefully spread the chocolate mixture over the top. 

Refrigerate for 15 minutes, or let the chocolate cool on it's own. These can be stored in an airtight container, probably for about a week, but somehow I doubt they'll stick around that long...

Enjoy!
 

13.2.11

Happy Valentines Day!

I actually like Valentines day. Chocolate, hearts, and celebrating love? Count me in. Sure, it's commerical, bla bla bla, and I know it is, but it's fun and I've always enjoyed it. I'm hoping/assuming that this one will be better than last, as I was on the kibbutz last year and a really nasty flu happened to be going around the volunteer crew that week. I spent Valentines Day in bed feeling wretched. But you know what? All my healthy friends came in and looked after me, and brought me water and made me tea. I think one of them even made my bed for me!  So really, it wasn't that bad of a day. I felt the love.
 But this year, there will be none of that flu nonsense. 
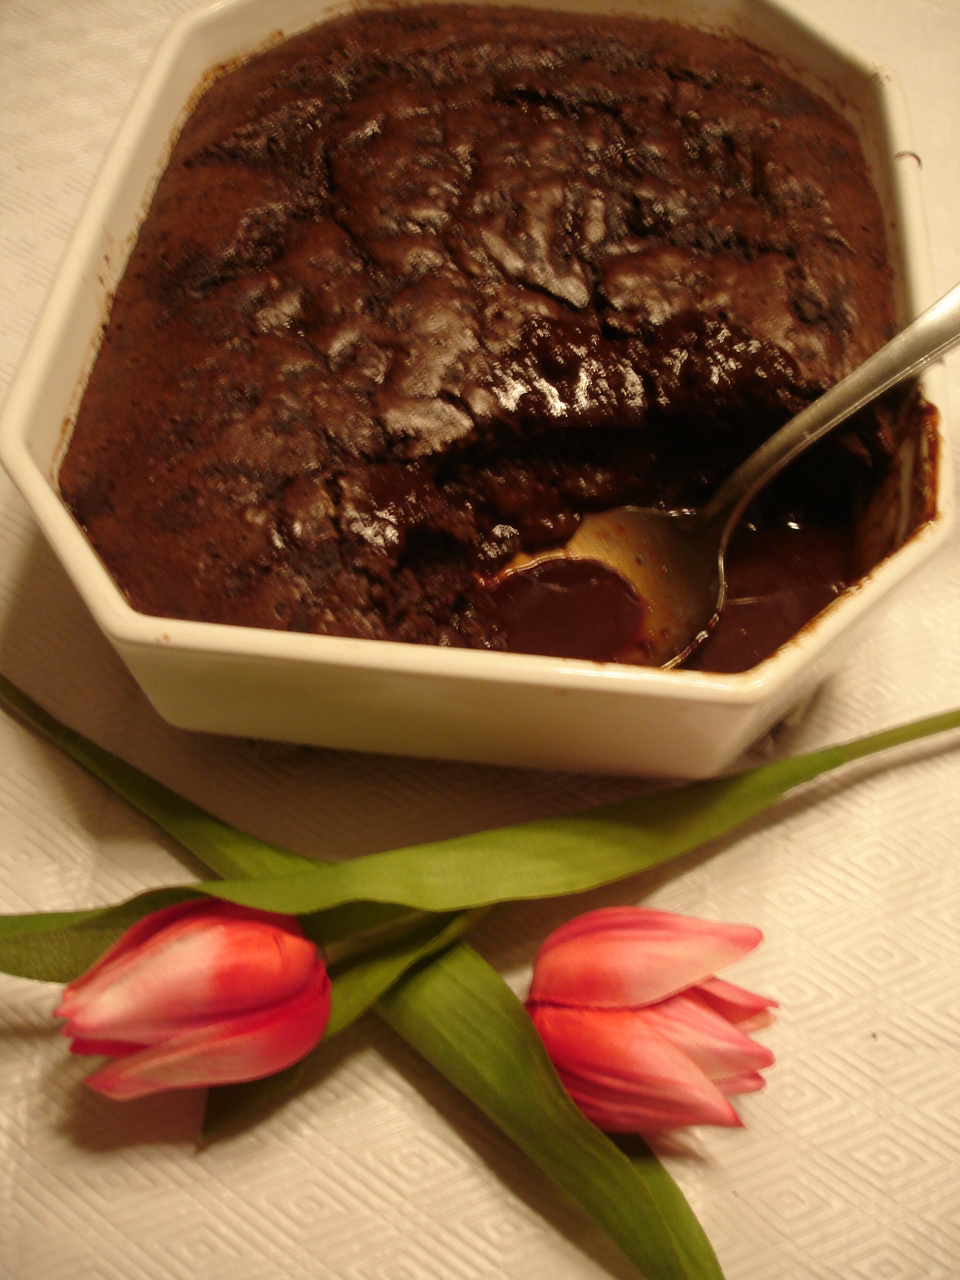
Anyway, I made a delightful dessert tonight in honor of the holiday. It feeds eight, so if you're having a little get-together, perhaps you could serve this! I got the recipe from BBC Good Food (the October 2010 issue). I made a few reaaaaaallly minor adjustments, but really I just followed the recipe. It turned out really nicely! Check it out.
 Self-Saucing Jaffa Pudding
Courtesy of BBC Good Food

By the way. I had no idea what Jaffa cakes were until I went to England. I have tried them, however, and they were excellent. They're named for the lovely Jaffa oranges, which, incidenally, are Israeli. (Jaffa is an ancient port right outside of Tel Aviv, and it is fabulous. Eventually, I will blog about it...)
This is quite different from a Jaffa cake, obviously. But the chocolate orange element is there. I did not use Jaffa oranges (can one even get them in the US?) I used, in spirit of Valentine's Day, blood oranges (well, really, because I saw a bag of them at the market and was so excited I just had to buy them...guess who's having red orange juice tomorrow for breakfast??) I also used pink salt, just because it felt more valentinesy to me, but I know that's ridiculous.  
Oh. Okay, one more thing. The recipe specified self-rising flour, and since I rarely bake, I didn't want to buy a whole bag of that. I read in a Nigella Lawson cookbook that you can make your own self-rising flour by adding two tablespoons of baking powder for every cup of flour you use, and if the recipe also involves cocoa (or buttermilk, or yogurt), to also (on top of the power) add a quarter of a teaspoon of baking soda to every cup as well. The recipe also calls for baking powder, and I used it. It was a lot of baking powder, but it turned out great, so, no worries. 

Ingredients
1 stick (8 tbsp) butter, melted
250 grams or 2 cups of self-rising flour  (or see above)
140 grams/5 oz sugar 
50 grams/2 oz cocoa 
1 tsp baking powder
zest and juice of one orange (try blood oranges if you see them in the store! mmm)
3 eggs
150 ml or 2/3 cup milk
100 grams/4 oz chocolate (orange chocolate, if you find it), broken into chunks 

FOR THE SAUCE
200 grams/7 oz sugar (light muscovado,  if you have it. I didn't.)
25 grams/1 oz cocoa

Preparation
Grease a 2 litre baking dish and heat oven to 360f (180c). Put the kettle on. Combine the flour, sugar and cocoa for the cake, baking powder, orange zest and a pinch of salt in a large bowl. 
Whisk together the orange juice, eggs, melted butter and milk until smooth. Add the chocolate chunks, stir to incorporate. Pour into the baking dish.
Mix about a  cup and a quarter of the boiling water from the kettle with the sugar and cocoa for the sauce. Pour it over the pudding batter. It will look water, slightly lumpy, and unattractive.  (BBC Good Food even warns this!) 
Slide into the middle rack of the oven and cook for 30 minutes. When you serve, you will find a spongy, delicate, chocolately cake and a rich beautiful sauce underneath. No idea how it works but it's fantastic. 
Serve immediately!
It would be a crime not to serve this with ice cream, or even just cream.  

Happy Valentines Day!  

11.2.11

The Best Burger on EARTH.

Hi friends! I'm terribly sorry I haven't been posting, but I just spend a splendid week away for my 24th birthday. It was fantastic. I went to Hartford, Connecticut to see one of my best friends, and then had a very brief trip to New York, which got cut short for a (successful, yay!) interview back in Boston. 
I spent my first two years of college studying theatre in Hartford, so it is a place I know well and have many favorite restaurants. In fact, during my entire time abroad, I was craving a certain West Hartford meal... a burger at Plan B. 
 Just amazing. I just ate an enormous meal and I still can't help but salivate looking at this. I'm an American. I've eaten hundreds of burgers in my lifetime. Plan B is by FAR the best in the world.
A few years ago, I spent a summer bumming around Hartford and living with my friend Jared. (Who, incidentally,  I was visiting for my birthday, and dined at Plan B with!) He was a waiter at Plan B, and so I ended up taking a job there as a hostess.  It was an amazing place to work...probably my favorite restaurant/food service job I've ever had. The vibe is amazing and it has a fantastic staff, not to mention a great team of regulars. I looked forward to work every day, and I looked forward to leaving at the end of the day because I usually had a takeaway bag of one of their delicious items that I knew I would be enjoying with Jared back home!  It is a gem of a restaurant. Everything so good that it's actually ridiculous.  Let me put it this way....the entire year leading up to the summer I worked in Hartford, I didn't eat red meat.  I think it took three shifts at Plan B for that to go right out the window. It's actually that good. They have a chile con carne with a horseradish cream which is actually stunning...a fierce macaroni and cheese (called Mac and Jack)..but as I mentioned before, shining star is their burger. 
On Friday, I had my favorite, the West Coast burger.  It has a fried egg, black olive mayo and avocado. I modified it so that it's on a pretzel bun (yes. a pretzel bun!!) and had truffle mayo instead of black olive. I may have asked for some pickles in there too. Anyway, it was phenomenal. Before Plan B, I didn't know it was possible for a burger to melt in your mouth. Guess what. This one does. However incredible you are imagining this burger to be, multiply it by fifty. Seriously. And the way the juices from the meat soak into the bun and blend with the creamy avocado and mayo...it cannot be beat. 
THRILLED.

I generally don't even like burgers. I'm not really a huge beef person.  I always find hamburgrers to be somewhat dry and dense and I never finish them. However, I could eat two burgers at Plan B and still be able to gobble up the sides of pickle and parmesan tater tots that I got with them. (They've got a great variety of sides; I'm loyal to the parm tots, but there's also sweet potato fries, truffle fries, green beans, etc. etc) 
Plan B also has a great bar, with lots of local craft beers, which is great. The B in the title stands for burgers, bourbons and beers. I don't know if it also stands for BEST, but it should. It truly is the best. When I got to New York after my weekend in Hartford, all my friends (who I used to live with in CT) asked the same thing; "Did you eat at Plan B??? How was it? Whaddya get?"
Seriously. If you are ever in Connecticut, go to Plan B. Even if you are driving to New York from the north, along route 84,  and were thinking of stopping for lunch at, say Reins Deli, maybe hold off another twenty minutes and go to Park rd in Hartford. Sure, you have to get off the highway, but it's worth it. 
The original is in West Hartford, but they've got locations in Simsbury and Glastonbury. And, as I learned the other night from some of my previous co-workers, they are planning on opening locations in cities in other states, like Boston (YAY!!!!!) Georgetown, Atlanta and Chicago. Amazing.
I'll be back on track with recipes and more tales of my delicious birthday meals (there were quite a few) in the next few days.

2.2.11

Cauliflower Salad

Oh MY. I don't know if I have it in me right now to do an entire blog post about salads in Israel, because it is an enormous topic. Salads are everywhere. No meal (especially breakfast!) in Israel is complete without the ubiquitous chopped salad of, in it's purest form, tomatoes, cucumbers, onions with lemon juice and olive oil. Falafel, shnitzel and shawarma (three of Israel's most popular street foods) are usually served in fluffy pita with hummus, and the consumer can choose from dozens of little salads to stuff in their sandwich. 
Cabbage salads, fried eggplant, pickled vegetables...the possibilities are endless and really vary from place to place. But let it be said. I've collectively spent nearly a year in Israel and can think of one meal that didn't include salads. (At a wonderful French restaurant in Tel Aviv) 
Both kibbutzim where I volunteered served a variety of salads for every meal. This cauliflower salad was served quite often with dinner on my more recent kibbutz, and it was one of my favorites. It is as simple as can be and tastes incredible. We always ate it as a cold salad, but I'm sure it would be lovely warm as well.
Working in the kitchen...probably about 6:30 am...not looking great
 I worked in the kitchen and on days where we made the salad, I often was the one to prep all the cauliflower. In those days, I was like a cauliflower prepping machine! I would have to separate a dozen or so crates of cauliflower into little florets, drop them into a large tub of cold water, cling film the top, and wheel it into one of the large walk-in fridges so our chefs could use it later in the day. When I did cauliflower, I always hoped it would be for this salad. It's so good! 
Cauliflower Salad

Okay, as I sit here chowing down on this salad, I implore you; if you make any of my recipes, make this one!! It was fun to revisit. And I really enjoyed the confused/slightly judgemental look on my cat's little face as I broke down the stalk of the cauliflower and pushed it down the garbage disposal.... Animals must think humans are so weird.
Also, a few notes....
The photo above will look slightly different from your final product, since I added the tahina after photographing and uploading it, just because I am absent minded and honestly couldn't be bothered to set up the camera and take a billion pictures of the cauliflower and then upload them all and choose the best one...I just couldn't do it again.  I'm sorry.
Don't be afraid of parsley! In Israel, it is used as an ingredient, not a garnish. It really stands out in this dish.
On my kibbutz, the cauliflower was put in a deep fryer. If you randomly have one, go ahead and fry them there! In that case, you don't need to slice them in half. 
Finally, I gave sort of loosey goosey instructions on making the tahina, because it's really to taste. Also, you won't use it all. Just spoon it on and make sure the tahina coats the cauliflower. Any leftovers can be used as salad dressing, eaten with pita, over meat...really anything. It's delicious.

Ingredients
One head of cauliflower, separated into florets and sliced in half  
Oil
1 lemon
2 cloves garlic, minced
1/2 cup Tahini paste
A handful of parsley, chopped
Water

Preparation

In a large pan, pour enough oil so that half your cauliflower will be covered. Heat the oil and then add half the cauliflower. Fry until it's soft, brown and the stems are translucent. Drain on a paper towel and add the other half. Do the same thing. 
Season the fried cauliflower with a little salt, pepper, and some lemon juice. Mix in some of the chopped parsley. Let it cool.
To make a tahini sauce: pour tahini into a food processor and squeeze over half a lemon, some parsley, and your garlic. Pulse and add water until it becomes a thick yet loose, khaki-colored sauce. 
Mix some tahini with the cauliflower and  squeeze over the rest of your lemon. Season with a bit of salt and pepper, but you won't need much. 

!בתאבון