Pages

16.4.11

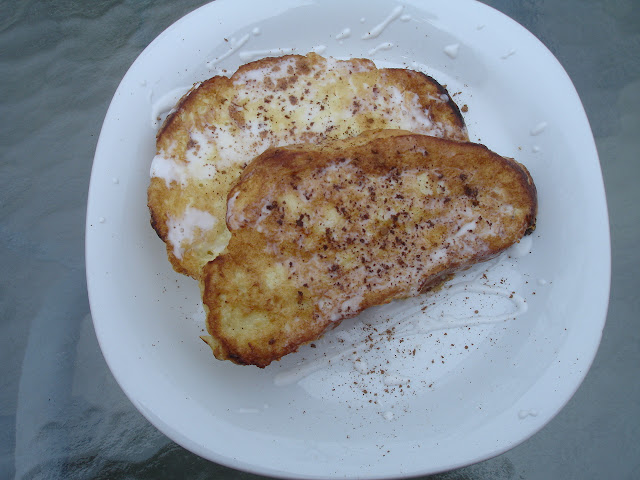
Coconut French Toast

This recipe is easy-peasy and delicious. I intended to include raspberries, but they oh so mysteriously disappeared from my fridge. Sigh. I'm pretty sure I was the one who ate them... (I love raspberries LOVE LOVE LOVE) 
But, er, I digress. 
Lemongrass would be nice with this, but I didn't have that either. It's not such a common thing for me to have lemongrass. Anyway, it was simple and lovely with plain coconut.

Coconut French Toast
Ingredients
2 thick slices leftover or stale bread; challah or brioche works best
1 egg
About a half cup of coconut milk
A pinch of salt
Coconut oil (or butter, if you haven't got it)
Preparation
Crack your egg into a shallow bowl and beat in your coconut milk.  This will be well thicker than your typical egg wash, but pay no mind. Add a pinch of salt to bring out the lovely flavor.
Over medium heat, melt your coconut oil.
Soak your bread, one slice at a time, in the egg mixture on both sides. 
Slip your bread into the pan and fry in the oil until golden, flip, cook, and remove from heat.
Garnish with a drizzle of coconut milk and sprinkle over some cocoa powder.

Yeah, told you it was an easy one. Delightful though. Enjoy. 
  

14.4.11

Banoffee Pie....

Ah, Edinburgh. Suddenly it was winter, although the calendar claimed to be August. Lies. I wore a coat and scarf. Boots every day. 
One pub night in Montpellier, Georgia and I randomly decided that we were going to go to Fringe for a week in August. I think my flight was seven pounds. (Why don't we have Ryanair-or something similar- in the States? It boggles the mind.) 
 My strongest memory of Edinburgh is the night we arrived. Georgia and I were little bundles of excitement. We went to the pub where Georgia's friend Floss was working, so we could pick up her keys to drop our luggage off. A man came out of the pub, saw us outside with our cases and handed us £10. 
"Welcome to Edinburgh! Enjoy your time in my beautiful city."
We tried to give it back to him, saying we couldn't take it, but he waved us off, and disappeared back into the pub with a smile.
And what a magnificent city it is. I am sure I didn't see the "real" Edinburgh, as it is an entirely different place the other eleven months of the year, but I got a wonderful taste. I also was lucky enough to be staying with Floss, who lives there year round and brought us to plenty of fantastic places off the festival track. 
The morning after we arrived, Georgia and I set out to see some shows, but decided to get lunch first. We found a great deal- lunch for £10 a piece, with a free beer thrown in too! For dessert, we each had a slice of Banoffee pie. I'd heard of it, but barely. Georgia, who's English, and therefore familiar with how incredible it is, urged me to try it and...sigh. Banoffee pie. 
The version I made the other night was absolute perfection. It came from BBC Food, and I wouldn't change a damn thing. 
It is almost entirely sugar and butter, so not exactly something I'd recommend making on the regular, but next time you're going to a party and need to bring a dessert, give this a go. It takes under an hour, no baking is required (although you do make two kinds of caramel) and everybody will go crazy for it. 

 Banoffee Pie
BBC Food

Ingredients

Caramel Filling:
100g/31/2 oz. butter
1 can of sweetened condensed milk
100g/31/2 oz. caster sugar

Pie:
150g/5 oz. English digestive biscuits (you can find these in  a number of import or gourmet markets, Whole Foods,  or sometimes just your local grocery store. Or you can substitute Graham crackers, but try for the digestives! They're great!)
230g/8 oz. pecans
75g/3 oz butter, melted
3 large bananas, chopped
250 ml/101/2oz. double cream, whipped until relatively stiff (again, you can find double cream at gourmet or import stores- I got mine at Whole Foods- and it really is different from our heavy whipping cream, so if you can, use it!)
Cocoa Powder, for dusting
Caramel Sauce:
125g/4 oz. butter
124g/4 oz. light brown sugar
125ml/4 fl oz coconut milk 

Preparation 
Crush together your digestives and half of your pecans. Pour over melted butter and pack into a pie dish. This will be your crust.
Make your filling: in a large, preferably nonstick pan, melt your butter and sugar over low heat. Once melted, add your condensed milk and stir constantly, slowly bringing to a boil. Eventually, after boiling, the mixture will thicken, be a light golden and will smell sweet. Remove from heat, taste to make sure, and let cool slightly.
Stir your bananas into the caramel and pour into your crust.
Cover and refrigerate for about a half an hour.
Meanwhile, make your caramel sauce. Pour your coconut milk, butter and brown sugar into a small, heavy bottomed pan, and stir constantly over medium heat. It will come to a boil, keep stirring for a couple minutes, until it is slightly thick (but still saucy) and a beautiful caramel. Never stop stirring, and be sure the heat isn't too high. Caramel can turn on a dime.  The coconut milk is great- lovely touch, BBC. When it's just right, remove from heat. Set aside.
Remove your pie from the fridge. Spread your whipped double cream over, then cover with remaining pecans (or to taste.) Dust with some cocoa powder, if you'd like. You can either pour the sauce all over (I did) or keep on the side and pour over individual slices.


Enjoy every bite....

4.4.11

Camarones de Nuevo México

When I first started this blog, I mentioned how, when I interview people about food, I always ask them which dish, if seen at a party, would make them say "Yay!"
The phrasing of the question may be silly, but it always seemed to translate. Everybody feels glee over certain food items, especially ones that they don't tend to make regularly. For instance, as I said in the previous entry I would have that reaction to a good charcuterie plate. 
A friend of mine from Mexico answered "camarones with garlic, butter and lime."  So delicious, so simple. I decided to give it a New Mexican spin, with green chiles! I unfortunately, but unsurprisingly could not find my beloved Hatch green chiles, so I used Anaheims. Occasionally real Hatch green chiles will pop up in markets outside of New Mexico, but it's rare, and it's not the right season anyhow...
If you've never deveined shrimp or prawns before, don't worry. It's not as fiddly as it seems, although it does take time. Rinse your crustaceans in a colander with cold water, and peel off everthing but the tails. (As you can see in my picture, I accidentally pulled the tail off a few) Using a paring knife, cut lightly down the icky dark line along the arch, and pull it out. It may come out in a couple of pieces. I found, upon doing this for the first time, that it takes a few to get the hang of it, and then it just becomes busy work for your hands.


Camarones de Nuevo México

Ingredients
1/2 lb (225 g) raw shrimp or prawns, peeled and deveined 
1 Hatch green chile, diced. (Anaheim works fine, though won't have the same kick. Another chile of your choice could also work, of course!) 
2 tablespoons butter (salted works nicely here)
3 cloves of garlic
1 lime
A small handful of cilantro, chopped  

Preparation
Preheat oven to 350º F/175ºC. 
 In a small, ovenproof dish, spread out your shrimp.
 In a pan, heat a small amount of either butter or clear oil and add your chiles and garlic. Once soft, add 2 tablespoons of butter. Melt over low heat and remove from heat. If your butter is unsalted, add some salt to it. 
Pour over your shrimp. Make sure it's coated well, then pop in the oven.
It won't require very long in the oven. Maybe ten minutes? It depends on the size of your shrimp. Just cook until they are all pink.
Squeeze over the juice from your lime, sprinkle with cilantro, and serve!

¡Buen Provecho!

3.4.11

Springtime!

Today, when I left for work, I wasn't greeted with a blast of icy air when I stepped outside my house. There were birds chirping.
Yesterday, I babysat and when I walked from the train to the house, I saw flowers in bloom. 
A few days back, I saw not one, not two, but three robins in my yard. 
Is spring finally coming to New England? 
I went to my favorite market today and saw the surest sign of spring of all; bright sunny green peapods. Hurray!  I love peas. They might be my favorite vegetable and I wait for spring all year so I can have them fresh!  Pea season lasts for about five seconds, which is why I always buy them when I see them. And they go hard and starchy pretty much as soon as they're harvested, so it's important to get them fresh and use them as soon as you buy them.
This green pea risotto is so easy to make, and incredibly satisfying. It's so much fun to make your own broth, too! In non pea-season, this is still possible to make, since frozen peas are the only frozen vegetable that are always excellent.

Pea Risotto
Ingredients 
1 lb peas, shelled. Reserve shells for your stock
1 cup arborio rice
A big splash of white wine
Butter
1 onion, diced
Pea broth (see recipe below), or vegetable or chicken broth 
Pecorino cheese
Fresh mint, chopped

For broth:
All your peapod shells
2 onions, quartered with the skin still on
2 carrots, unpeeled, cut in rough chunks
2 parsnips, unpeeled, rough chunks
3 stalks of celery, greens included, chopped roughly 

Preparation
Make your broth. Put all the vegetables in a large pot and cover with water. Bring to a boil, and then reduce to a simmer. Let it simmer for at least an hour, skimming the top occasionally. When it's ready (taste to make sure), season with some salt, and strain. Discard vegetables. (Also, you can add other vegetables, if you'd like more flavor! Just be sure to avoid any cruciferous veggies- though delicious and super healthy, the long simmering will make your kitchen smell terrible and will throw off the flavor of the broth!)
Bring your broth back up to a boil, then reduce heat enough so it doesn't boil over, and cover slightly to retain heat. 
In a large pan, heat about a tablespoon of butter and small splash of clear oil. Add your diced onion. Once translucent, add your rice and stir. You want to make sure it's well coated in butter. 
Add a big splash of white wine and stir to incorporate. The rice will absorb the liquid. Once absorbed, add a ladlefull of the hot broth. Stir constantly and watch the rice absorb the liquid. Continue this until the rice is plump and doesn't want to take any more liquid- it may be safer to reduce the amount of broth in your ladle after a few times, so it doesn't go too liquidy.
Right before your last ladlefull, add your peas. 
Remove from heat. Add a good chunk of butter, and lots, and lots of pecorino. It will disappear into the rice as soon as you stir it, but don't worry, you'll taste it. 
Season to taste, and serve with chopped mint leaves on top. White cheese, peas, and mint is a beautiful combination of flavors that I could eat every day...
Enjoy! And if spring is blooming where you live, enjoy all the lovely new produce!

2.4.11

Food of the vagabonds...

As you may notice, I have changed the name of the blog.
"A vagabond or “drifter” is an itinerant person. The word is derived from the Latin adjective vagabundus, “inclined to wander”, from the verb vagor, “wander”. It does not denote a member of a nomadic people, but rather an individual who follows a wandering lifestyle within a sedentary society. Such people may be called drifters, tramps, or rogues. A vagabond is characterized by almost continuous traveling, lacking a fixed home, temporary abode, or permanent residence. Vagabonds are not bums, as bums are not known for travelling, preferring to stay in one location."
 Perhaps I am a drifter. Even as a little girl, I tended to float between social groups. I don't like staying in one place. I get antsy, restless.  I can't help it. It's inside of me, somehow. Even now, the most settled I've been in a long time, I am itching to move on, and have been fighting it like mad, because I really need to have a bit of money saved. And it's...exceedingly difficult for me. 
I like sleeping in tents, and on the couches of people I've just met. I love busking, and farm-hopping and hitching, and not knowing where I'm going until I realise where I want to go. I don't tend to like hotels, or even hostels, or organized trips. I enjoy being lost. Because I'll always find something. One must get lost in order to be found again...
I just...I  feel drawn to certain places at certain times, and I like to follow those instincts. Right now, I am actively suppressing those instincts. Like I said, it's hard for me. I keep feeling like ignoring myself will have some sort of consequence, which I know sounds "crazy".
I'm safe and healthy and happy here in Boston. But somehow, it's not enough. I need to be flying by the seat of my pants. Or, er, my leggings.
It's who I am, and I know it's not a lifestyle that is comfortable, or for everybody. I don't know why I am this way. But I am, and I'm happy to be who I am.
 Anyway, for the time being, I am here in Boston, and I will continue to dream of the places I want to be, and cooking is, besides reading, the best way to pretend you're somewhere else...
So for now and forever, I dub this blog "My Vagabond Kitchen."
In honor of the name change, I have my favorite backpack-y meal. I have eaten this in tents, in parks, in tiny, stoveless flats and dorms and...really everywhere. It involves no cooking, minimal prep, and condiments that come in sachets which you can swipe from a pub table. The ingredients will vary, depending on where you are what time of year it is. However, wherever you go, these vegetables tend to be available, and cheap. This has been made so many times and it's always important to use what you have on hand. When traveling, I always have a "food bag", of all the acquired bits and bobs from the past week or so. Fruit, crackers or bread, vegetables, garlic, chocolate, salt, pepper, and condiment sachets, napkins...Waste not, want not.
Be sure your cans have peelback lids! I can't imagine lugging around a can opener, besides, that would make your next flight a nightmare, as it would add unnecessary weight to your suitcase, and I doubt it's legal to carry on...
This is a wonderful meal to share with your travel buddy. No plates required. A couple of forks and spoons are always good to keep in your food bag, however. I have strong memories of Copenhagen, being so hungry and getting all the ingredients to make this salad, and not having any cutlery! We looked in ice cream shops, takeaway places...I don't even remember what we eventually did...I'm sure we managed. That's the thing. You always do.

 Corn and Tuna Salad
Ingredients
1 can of tuna, drained
1 small can of corn
1 cucumber, diced
1 tomato, in cubes
1/2 red onion, diced
1 carrot, diced
1 lemon
1 teaspoon (or sachet) of mayonnaise
Salt, pepper, and any spices you have...
Optional: Any other vegetables that you have (red cabbage or radicchio was always nice, nuts also add a wonderful element.)
 
Preparation
Mix the tuna and the mayonnaise. 
Combine all ingredients, squeeze over the lemon juice, and season well with salt and pepper. 
Eat. Savor. Feel sustained. Enjoy your day, or your night. 
Happy Trails...